
Reaching level 4 of gymnastics is one of the most common goals that young gymnasts have. This is because once you reach this level you can start competing in gymnastics events. While the lower levels can sometimes have non-competitive meets, this often only gives a taste for the real thing and wets a young gymnast’s desire for the real thing.
In order to become a level 4 gymnast you must be at least 7 years old and have at least a 75% proficiency level of all the skills from gymnastics levels 1-3. This includes quite a number of different maneuvers and is sometimes one of the levels which takes the longest to graduate to.
Usually, for new level 4 gymnasts, the competition year starts around December or January, but the higher levels tend to start having the first of their tryouts starting sometime in November. The State meets are usually held sometime in March, and March-April is considered the end of the gymnastic year, with regional and national competitions being held in April if you qualify for them.
There are a lot of acronyms that go along with gymnastics meets and these can sometimes be confusing but are very important to know. Knowing more about how to prepare for these first competitions can be a vital part of making sure that everything goes smoothly too.
What Are The Skills You Need To Pass To Graduate To Level 4?
As mentioned, you have to have at least a 75% proficiency level with all of the skills of the previous levels. However, some of this is still up to your coach. Since level 4 tends to be much more competitive, most coaches wait longer before letting you move up to this level so that you will do well in your first competitions.
That being said, other coaches will sometimes do the exact opposite and move you to level 4 as soon as possible so that you can start getting used to competing as you continue to work on your skills. Therefore, you can see that some of this is based on your coach’s preferences.
On The Floor
You should be able to do handstands, headstands, backbends, and bridges while being able to hold each of these positions steady for a while. Split leaps and split jumps should be close to 120 degrees at the very least, with full splits on the ground not being a problem at all.
When it comes to backwards maneuvers there is the backward roll, the backward straddle roll, the backward walkover, the backward handstand, and the backward handspring with the round-off backward handspring. Each of these maneuvers must also be done forward as well of course.
Then there are the simpler things like cartwheels, leaps, and different walks that are practiced more on the bar now than they are on the floor, but should still be done on occasion to keep in practice. Some of these will be done as you warm up now.
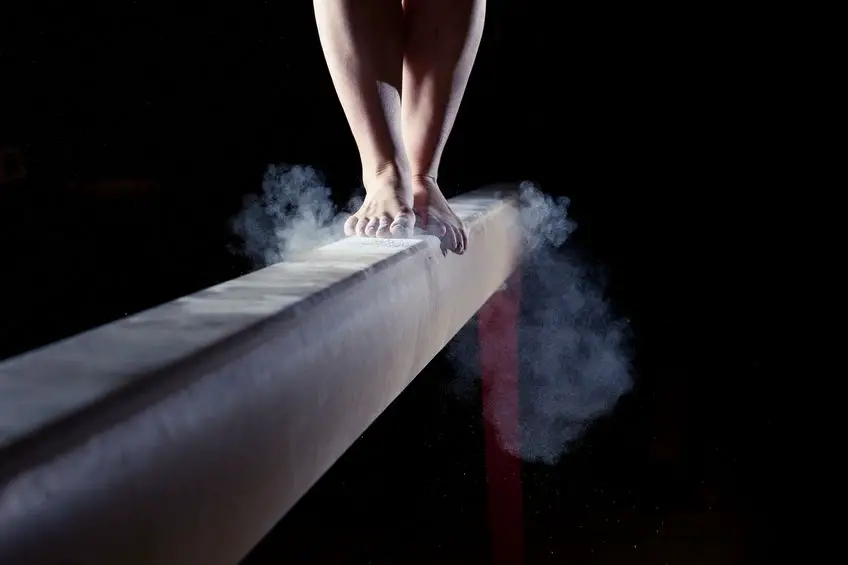
On The Beam
As you have no doubt been practicing, almost all of the maneuvers that you can do on the floor are ones that you should also be able to do on the beam. The only real exception to this is the fact that you are usually not yet to point of doing many of the backwards maneuvers while on the beam.
You should also be able to do the maneuvers that are unique to the beam. These include things like the different ways to mount and to dismount, but it also includes other things like the releve walk and the releve walk with a leg swing.
On The Bars And Vault
You should be able to do at least three chin ups to the bars and least five leg lifts. You should also be capable of doing a pullover without any starting momentum or any empty swings to help you out. Even if you have not gotten the more complicated maneuvers perfect yet, you should still be able to do the mill swing, kip swing, and the other ones that you have been working on with a fair degree of proficiency.
The back hip circle, cast, leg swing, shoot through, and things like that should be mastered. You should also have perfected at least one of the mounting and one of the dismounting maneuvers since this is especially important when competing in level 4.
While once again there is not much that you have to do on the vault, you should be able to show that you can do a jump into a front handspring onto a stack of mats and flip and land onto your feet and stick the landing when you do so.
What Do You Learn In Level 4 Of Gymnastics?
By now you have likely started to notice that most of the things that you learn to do on the floor eventually get moved to one of the other apparatuses. As usual you will be adding to all of the previous levels and building onto them to make them more challenging.
On The Floor
Now that your split leaps are at least close to 120 degrees, in this level you will push more to get them to 150 degrees. If you have not already done so, then you will start working on your forward splits where one leg is facing perfectly forward and the other going straight behind you as opposed to side splits where your legs point to the sides.
Once you start getting front splits down fairly well when sitting on the ground you will start adding them to the leaps and jumps. This is true both here and on the beam.
You will also be adding pivots to your coup walk in this level and a new form of walk called a chasse. A chasse is not really so much of a walk as it is like skipping, and after you learn it well then later on it will be added to the beginning of other moves like leaps and jumps.
However, in this level you will mostly be combining the different maneuvers that you already know, going straight from one into the next without deviating to either side. A back flip will be added to the end you your round-off maneuver which is occasionally termed a flic-flac. Another, slightly longer one that you may work on is a handstand into a bridge into a back kick-over.
While these maneuvers by themselves are not challenging by now, they can still prove to be hard when it comes to adding them together. The goal is to get all of your movements more of a flow which is an important factor when competing.
On The Beam
The V-sit to squat position that you worked on in level 3 will now be taken one step even further and turned into a V-sit to a tuck stand. Your arabesque position will be increased in angle from 30 up to 45 degrees with your scale now needing to be perfectly horizontal.
Your mounting and dismounting will still be worked on, with a new leg swing with ½ turn mount being added for you to learn. This is fairly simple to do, but it does require you to be tall enough to swing one leg over the beam or to have a spot to do this. Once you have one leg over and are straddling the beam with your feet off of the ground, you then swing both legs forward and then back for momentum.
Use this momentum to lift yourself just enough to place one of your legs under you. This position should be with your knee bent and sitting on your leg. From there you simply lift yourself into a standing position with both feet on the beam.
Also new is another variation of the handstand which is called the ¾ cross handstand. This is where you essentially do ¾ of a cartwheel while your hands go into the handstand position and your legs flip over as though you are going to flip back onto your feet on your other side but you stop there.
Finally, you will be adding the sissonne to the list of jumps. The sissonne starts off like a split jump, but you lean forward with your arms forwards after you jump and you land on only one foot with your other foot pointing back for a moment.
On The Bars
Perhaps one of the most difficult things on the bars is still the sole circle at this point. This will not only be worked on but you should be able to start getting into this position without a spot. What is even more difficult is that you will now start learning how to do backwards sole circles which should ultimately be able to end in a front support position on the bar.
The new circle that you should start learning is called the stalder circle. For this you start in the front support position, then in one move you swing your legs up on the outer sides of your arms, keeping your knees straight, to where your feet are beside your head. You then swing in a complete circle like this and return to the front support position.
On The Vault
If you have been wondering when you would get to start practicing on actually vaulting, congratulations! You are there! This is the first level that really has you starting in on your vaulting skills. While this is still kept really simple with a jump into a handstand, it can be nice to finally start working on a little bit more here.
What Are The Different Acronyms For Gymnastics?
The acronym USAG stands for U.S.A Gymnastics. The USAG is a national sports entity which is what controls the U.S. Olympic gymnastics team. On the other hand, the AAU is a very large league that has numerous clubs that do compete against each other, but not to the same level as the USAG does.
The acronym AAU stands for Amateur Athletic Union and is much better suited to hobbyists. Not only does the USAG compete more, but the rules are stricter most of the time and the competition tougher because the main goal of these are to help pick out who has what it takes for the Olympics.
Both the USAG and the AAU require memberships to compete in their events, each one has different benefits that come with this membership however. The USAG for example often gives discounts on supplies and apparel, while the AAU tends to give discounts on travel expenses.
A couple of other acronyms that you might see are TOPS and HOPES. Both of these, as well as Elite and Future Stars are training programs of the USAG and are designed for kids 8 years old and up who show promising gymnastics skills. In order to get into any of these programs you have to have been doing gymnastics for a while and pass some rigorous testing that shows that you have what it takes.
Other acronyms are used when talking about competitions. FX stands for the floor event, BB the balance beam, VT the vaulting event, and usually UB for the uneven bars. Some of the other acronyms that it is good to know are: DV stands for Difficulty Value, SV for Start Value, GG for General Gymnastics, and J.O. for Junior Olympic.
Many of the more common of the maneuvers can also be given acronyms such as RO for round-off. Finally, if you were to read a lot of gymnastics forms you might come across DD or DS, and this is not really useful but is a cute and fast way to say Darling Daughter or Darling Son. It can also be DH to refer to a husband or DW to refer to a wife.
How To Prepare For Your First Gymnastics Competition
Your first gymnastics competition can be a huge deal! There is a lot more to competing that just practicing the routines that you are going to need to do, though practicing is an important part. However if you forget to bring something or don’t arrive at the right time, it is entirely possible to be so late that you miss the time that you were supposed to do your performance.
To help you make sure that your first competition is a trouble-free as possible, here are a few things that you can help you. While some of the things I will mention are optional, it is still good to at least keep them in mind when you are getting ready.
1. Things That You Should Do In The Days Before The Meet
While you will obviously want to make sure that you know your routines well and keep practicing them, you should be careful so as not to overdue it. Many coaches will actually back off on the training in the days before a competition in order to let the gymnast rest.
This is particularly needed because stress and nervousness can make you tense up, and you need your muscles to be well-rested to help counteract this. It is much better to spend this time working on light exercises that involve perfecting the details of your routines.
Along with this you should also pay closer attention to what you are eating. Do not eat anything that gives you gas or that usually upsets your stomach even a little in the days before a meet. Nervousness can turn what might otherwise have been a mild upset stomach into a severe stomach ache and can even give you one all on its own without the help of certain foods.
To this end, it is vital that you especially take care in planning what you will eat on the day of your meet. Ideally whatever meal you eat the morning of your meet should be both filling and set as easily as possible on your stomach. You should also plan snacks and things that fit this same description.
Avoid caffeine in any form, since this can sometimes make you feel jittery. The same thing is true of energy drinks and things like that. If you are feeling extra tired then try to take a nap, don’t go for either of those.
You should also be sure that you are getting enough sleep of course, but also do things that you find relaxing like reading a book, watching a movie, or something else that will help you to get your mind off of your impeding competition.
2. What You Should Plan On Bringing With You
First and foremost you will need to bring money or you will not be able to pay the admissions fee to even get in the front door when you arrive! You also might need money for other things while you are there. Gymnastics meets can last for hours, depending on how many gymnasts there are who are competing, so you will likely want to be able to buy something from the concession stands.
Sometimes there will also be souvenir stands as well that sell interesting merchandise, and these can make for great mementoes. While you might already have a rough schedule of the events, detailed programs must often be purchased as well if you want to know what order the gymnasts will be competing in.
The second most important things to pack are the things that you will need for the competition. These include the leotard, chalk, tape, grips, something for your hair if needed, and gymnastic shoes if you want them for the balance beam event.
Also, another vital thing to pack is your camera! Even if you don’t do scrapbooking or anything with the pictures, you will want to hold on to the memories. Just be sure to turn the flash off, since if you take a picture with the flash on you might very well get a warning from one of the staff.
If you do not want to purchase any snacks at the concession stands then you should definitely bring your own. For gymnasts these snacks should not be sticky, crumbly, and preferable not something that they have to touch a lot with their hands since their hands will most likely still have some chalk on them.
Whatever you pack should not be a messy snack and you should not bring water in an open cup that could be knocked over or spilled as people have to get past you on the bleachers. This is especially true of sports drinks which can be sticky if they spill, and you should pack at least a few bottles of water.
Quite a few people also like to bring seat cushions to sit on. Most of the gymnastics competitions have metal bleachers for seats and these can get quite uncomfortable after a while. Even having something as simple as a towel or blanket that you can sit on can be a great comfort.
3. What Time You Need To Arrive
Hopefully your coach or someone told you what time you should get there at, but if not you should at least have some form of a schedule that tells you when the different things start. If you have this then you should look at the time that the first thing starts at.
Once you have this time, you can then plan on arriving no later than 15 minutes before this. The reason why you must get there early is because you not only have to get to the right spot, but there will also be a check-in near the front which might very well have a line.
However if you are simply planning on attending, you do not have to arrive when it first starts since the gymnasts will usually have some warm-up time before the anthem is sung and the competition really begins. When you first arrive you will have to pay an admissions fee for everyone besides the gymnast in your family who is competing.
Once that has been paid, you will then have to take the gymnast to their own sign-in area where they will be assigned a number and where their coach and the rest of their team will likely be waiting for them. Once that has been done, you can go get a seat in the stands.
It is usually best to get your seat as soon as possible before checking out the different concession stands that are sometimes there, since the best seats will be taken first due to the fact that there is no assigned seating.
4. A Couple Does And Don’ts For Parents
While there are a number of does and don’t for the gymnasts, there are actually a fairly large amount of things for the parents and spectators too. While some of these are no-brainers, others of them just might be something that you have never thought about before.
As mentioned, you do not want your camera to flash at all when you are taking a picture. The flash of a camera, if it happens to shine into the gymnast’s eyes, can possible blind them for a moment. This can be really dangerous if they are on the balance beam or on the bars and could potentially lead to an injury.
The same is true for turning the flash off of the camera on your phone if you plan on using that to take pictures with. Even some video cameras have a bright light, so you must check for this and also turn it off too.
Cheering is perfectly acceptable at any point for your team, friend, or child except for while they are in the act of doing their routine. There are also boundaries that the spectators are not allowed to cross and, yes, this is even if you are parent to one of the kids performing.
Most of the time these boundaries are clearly marked, and the only people besides the gymnasts on the other side are the coaches, judges, and certain staff. You should respect this and be ready to pick up your little gymnast at the designated area at the end of the four events and after the awards have been given out.
While it can be quite difficult to do, it is important for both you and your kid that you do not try to compare their skills to that of the other gymnasts. Brooding over the differences will only be all the more discouraging to your little gymnast if they didn’t do well or will potentially make the other parents think you to be a snob if you keep bragging on them.
No matter what the scores are you should always find a few encouraging words to say. Remember that some coaches push their kids into level 4 faster so that they can get used to competing. So, if your kid’s coach is one of these, it will only be natural to have low scores for the first few competitions.